Sunday 22 December 2013

More Tea?


Having had such fun making the last tea cup I constructed another one! Making a few subtle changes so it was slightly less wonky...


The message along the top reads;

'Her heart was a secret garden and the walls were very high'

If I was at all good at felting I would have liked to make tiny strands of ivy to climb delicately up the walls of the cup.


...Miss Jones...

p.s. Merry Christmas!

Thursday 12 December 2013

Time for Tea


I found a tutorial for a paper teacup the other day on pinterest. And, as I was on a paper creating roll I set about making one.
 
I didn't particularly follow the template or instructions; so my teacup is slightly wonky looking.
 
With its slightly crooked handle, wonky sides, and uneven bottom, it is quite charmingly rustic.
Carefully cutting out the letters for the words 'Time for Tea' was perhaps the trickiest part of all. Small letters like those were just designed to fly across the kitchen table at the slightest bit of breeze!


...Miss Jones...


Thursday 5 December 2013

Just a Little Bit of Origami


I have been experimenting with origami today. The folding is very therapeutic and I'd never before realised quite how much fun it was!


I successfully created a star, a dress and lots of little boats (the boats are my favourite!)


The boats are made from a mixture of music sheets and book pages. They have teeny tiny flags and sit quite elegantly on their little sticks. 


...Miss Jones...

Wednesday 27 November 2013

Fine Lines.


It was one of my best friend's birthdays on 18th November, and (as an awful friend) I have only just finished making her present. It is compiled of quotes I know she loves, and ones I feel suit her perfectly.
 
 
They are taken from a variety of places; Alice in Wonderland, Cinderella, Roald Dahl, Shakespeare and some from the wonderful Pinterest. I love the difference in fonts; some fine and elegant, some bold and abrasive. I'd forgotten how much fun writing and drawing in fineliner was - might have to do this more often!


...Miss Jones...

Monday 18 November 2013

'Get Off of My Cloud'


I have had this project half finished for rather a long time... So I am happy to report that it is finally finished! It is a happy cloud - quite appropriate considering I am writing this on a dull, drizzly day!
 
 
It is made from pretty scraps of fabric, which were really too small for anything, but far too nice to throw away! The intricate lace of the cloud perfectly represents the many droplets of water which hang suspended in the sky.


...Miss Jones...
 
p.s. 'Get Off of My Cloud' by The Rolling Stones, of course.

Monday 11 November 2013

Handmade Wreath


I know I promised to blog everyday, but once every couple of days is just as good, right? It's certainly better than my previous track record!
 
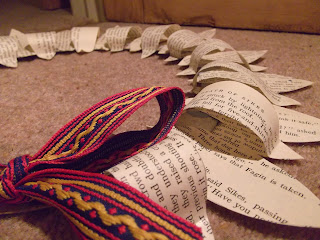
With Christmas fast approaching, once again I started to make another wreath a couple of days ago. But a combination of things - waiting for glue to dry and going away for a couple of days - meant that I have only just finished it! I decided I would challenge myself to make it entirely from scratch - here are some instructions in case you are ever tempted to make one yourself!


Step One
Cut a ring out of cardboard - I found it easiest to use a cereal packet - and use two different sized plates to draw the circle.
 
Step Two
Coat the ring in papier mâché (newspaper and glue) to make it stronger. I repeated this several times, letting it dry thoroughly in between. If it still doesn't seem very strong you can, like me, always add a ring of wire. I simply cut a length of wire to fit inside the circle and then used masking tape to attach it to the card; before adding another layer of papier mâché.
 
 
Step Three
Choose a book - I used the remaining pages of Oliver Twist. Cut out three different sized leaf templates - you need one large, one small and one narrow and long. With the large leaf cut out 30/32 leaves from the pages of your chosen book (I only did 28 because that's when the pages ran out).
 
Step Four
Stick these large leaves to the wreath (which is now hopefully dry!) You need to place one under the wreath and one on top of it so you make a kind of wreath sandwich. I left a gap of about 1cm between each leaf.
 
Step Five
While that dries cut out 15 of your small leaf template and 15 of your narrow, long leaf template.
 
Step Six
Stick a short leaf underneath the wreath in the gap you have left between each of the larger leaves. Make an arch with the longer leaf over the top, so you stick just the two tips of the leaves to each other. Leave to dry.

 
Step Seven
Find some gorgeous ribbon and thread it around the wreath, or alternatively tie it in a beautiful bow.

Voila! Your very own handmade wreath!


...Miss Jones...

Thursday 7 November 2013

Passion.


Very much inspired by this quote today:

'If you can't figure out your purpose, figure out your passion.
For your passion will lead you right into your purpose.' T.D.Jakes

I have many passions - I guess I'll wait and see which one leads me into my purpose!


...Miss Jones...

Monday 4 November 2013

Fine Feathers


As I am now, officially, 'unemployed' I decided to start my first day as I mean to go on - by blogging!

Today has not been the most creative of days; but I have succeeded in getting my hair cut and making some paper feathers. I had seen some similar feathers on Pinterest, and after admiring them for some time I figured it should be easy enough to accomplish (if I was careful and patient!)


I began by carefully drawing and cutting out some templates; which I then traced onto some pretty wrapping paper from Paperchase (it has some of the nicest patterns, doesn't it?) before, once again, carefully cutting them out.

I haven't quite decided what to do with them yet - perhaps mounted on a piece of crisp white card and elegantly framed?


...Miss Jones...


Sunday 3 November 2013

Memories.

Many weeks ago I set about creating a memory holder made from a vintage book. I had only vague ideas of what it was to eventually look like, but with a little bit of effort I quickly finished it.
 
Unfortunately I was so busy in the weeks leading up to the Frome Vintage Fair that I completely forgot to take a picture of my masterpiece. I sold it to my friend over at Vintage Jane, who was so enamoured by my 'book' that she decided to blog about it too! You can find a link to it here.
I therefore decided to create another one...
 
 
I've matched the plain beige cover to a subtly patterned fabric; leaving more of it showing this time to provide a bit more colour. I carefully wrote out a quote from Alice in Wonderland - 'Curiouser and Curiouser' - quite apt don't you think?


The memories included are a newspaper cutting from 'The Nursing Mirror' circa 1921 and a poem entitled 'The Sweet-Brier Rose'.
 
 
...Miss Jones... 

Friday 2 August 2013

Quick Game?


I spent a happy half an hour today tinkering with Scrabble tiles.


Arranging them this way...


... and that.


...Miss Jones...

Sunday 28 July 2013

Trio of Birds


So after a rather prolonged absence, I have finally got back on the blogging bandwagon! It's not that I haven't been making, just not blogging about it!

My first creation was this trio of delightful little birds. They are all hand-stitched and have perfectly mismatched wings.


...Miss Jones...

Saturday 4 May 2013

Spring Bunny


With the arrival of Spring and the sun I decided that a 'Spring Bunny' was crying out to be made! The shape is slightly better, but still a bit wonky - I'm working on improving my technique!


He's got cute ditsy floral patches, pink whiskers and a floppy ear; and is all set for a weekend of sun!


...Miss Jones...

Wednesday 10 April 2013

Hey Dolly


So with the (relative) success of my Easter bunny, I embarked upon a new project. A doll. This time I was all on my own; no pattern, no instructions, just a rough idea of what I wanted the finished project to look like.

The pattern was not too hard to make, the fabric was easily cut and sewn, but the problems began when I started to stuff the body. I cannot sew shoulders. No matter how even they look when pinned neatly, the moment I start sewing, the machine takes over, and ... well, suffice to say, the results are never pretty. 


She also suffers from a serious case of double chin... Unfortunately this cannot be rectified, and is probably not noticeable to others, but that is all I can see (as it often is when you've made a mistake!)


After sewing the body together, I set about making a pair of old fashioned bloomers and petticoat. And, surprisingly, I managed this very well!! A top (slightly more difficult) and skirt (complete with belt) finished off her outfit. Now I just had to give her some defining features; bright blue eyes, a pretty rosebud mouth and golden flowing locks. The locks don't 'flow' so much as hang, or stick out awkwardly, but not everyone's perfect!


So, there we have it, one (slightly) imperfect (but beautiful all the same) doll!!


...Miss Jones...

Sunday 10 March 2013

Easter Bunny


 As Easter was drawing near and I was currently without a project, I embarked upon this little bunny. The pattern was taken from Sarah Moore's lovely book (http://www.sarahmoorevintage.com/) and was actually surprisingly easy and quick to make!! I used a lovely, but sadly moth-ridden, vintage wool blanket, to cut out my bunny template, stitched it together quite carefully, turned it inside out. And ended up with a rabbit that has one ear longer than the other, body-builder's shoulders and one leg longer than the other. Oops!! Nevertheless I filled it with stuffing and lavender and sewed up the seams. A few stitches across the arms and neck to give him shape, and he still, sadly, had body-builder's shoulders. 


So, I commissioned my mother to knit some mittens and a scarf (despite being able to sew, I still have not managed to knit), added a cute little bunny face, and voila! He looks like a rabbit!!! The scarf and mittens are much needed, as despite being March he is still too cold to  go out sans clothes!


Oh yes, and he's got a cute tail.


...Miss Jones...

Sunday 17 February 2013

Hanging On


I have always loved the way clothes look on coathangers. Not your average plastic Primark hanger but an expensive, wooden, Boutique hanger. The clunk as you push hangers from one side of the rail to the other searching for that perfect piece of clothing that will complete you!


So having found some old wooden hangers at a car boot sale I set about making them my own. Painting them in Farrow and Ball's 'Smoked Trout' I then set about carefully tracing on my chosen words. This needed a lot of patience and had to be done when I was at my most calm!! A final lick of polish to seal the paint and they're done!


...Miss Jones...

Wednesday 23 January 2013

All Strung Up


Having recently acquired/borrowed from Mum, a copy of ‘Granny Chic’, and noticing a rather blank patch of wall in my room, I decided to create a ‘quirky & jolly string’. I have decided on a slightly more modern update than the one featured in the book. I’ve composed mine from a mixture of book pages, wrapping paper, mirrored beads, feathers, beads and fabric flowers.
 
It was slightly more complicated than I originally thought it would be… Knotting tiny bits of thread is just a little fiddly and becomes tangles far too easily! But with two nails hammered into my walls, my ‘quirky & jolly string’ looks quite pleasant and fills a gap quite adequately!


...Miss Jones...